There are some house projects that we would label a "test of marriage."
Our first one, we built at our old house.
I have no idea how it held up so well over the years, since we used no base materials on it....that's right, just laid them right into the soil.
We also had two children.....which could--at moments--qualify as "tests of marriage."
And our latest (I would never say "last," lol)...our new house has many more slopes than our last, so on our list of projects was to build a few retaining walls to level out the garden areas. Here is the before.
The first mission was to eradicate the weeds. Some of them were starting to look quite pretty! And tall.
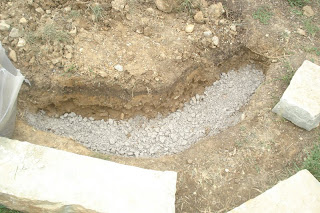
We ordered our pallet of buff stone. The day before it was delivered, we began digging the holes.
And our pallet arrived the next day. A huge thrill for my 5-year-old when the truck delivered it and used a little Bobcat to lift it onto the driveway.
Charlie took advantage of some deep trenches to build a bridge using rocks and bricks for his little cars.
The guys at both the stone supplier and the hardware store were extremely helpful. We also picked up a booklet that explained step-by-step what to do. Since, you know, our last one was built by the book. ; )
Basically, you dig your trench, fill in with a crushed limestone gravel, top with sand and then place your rocks. The most used tools in this project? A level and measuring tape. If your first row of rocks is not level, you have no chance of your wall standing up to anything. Or looking good. It ALL has to be level.
After the first level is laid, then you have to find the right length rocks to fit the second row...and make sure they are roughly the same height. It became more lengthy of a process, since we were working with imperfectly shaped rocks. They were all roughly 4" high and 8" wide, but there were variations and you have to choose rocks that will fit together and look good placed on top of one another.
Here is our first small wall, finished. It really levels out the area where the ground dips in front of the front walk.
Then, we began the second wall, having felt victorious with our first one. This wall needed to be five-ish rock rows high, so the stakes were raised here. We started with our first row. We used that d$%^ level quite a lot....
This pic shows the third level being laid.
This post is getting picture heavy, so I'll continue with the next one. As I said, it was a gargantuan project. Pictures are forthcoming, but tomorrow I'm planning to buy topsoil to fill in the planting beds!
I see a light at the end of the tunnel......; )
P.S. Major props go to my husband, Freddie, who did the majority of the rock lifting and digging. We nursed our battered bodies with ibuprofen and adult beverages at the end of the day. : )


1 comment:
Looks fantastic! And I agree 100%..home improvement projects AND children are both tests of marriage!
Glad you posted this...we've been tossing around the idea of a retaining wall for our front walk, but had no idea how to get started. Now we do!
Post a Comment