Sunday, July 31, 2011

Party time.....Link party time!

I am over the moon excited this week to be co-hosting the Creative Bloggers' Party and Hop with SJ from Homemaker on a Dime! I love link parties....such an easy way to share your projects. It's great to see all of the new projects from other blogs. They give me inspiration for my own creations and I find new blogs to explore and follow!

I am still fairly new at this blogging thing and SJ has been such a friendly and welcoming face! She spreads a lot of blog love. : ) I was honored when she asked me to co-host with her.

Let's get to it!

All you have to do is:

 1) Link up whatever creative post you'd like to
share--it can be a DIY project, decor, photography, crafts, recipes, link party,
poem, thrift finds, or that informative syndicated post that can make
us laugh or cry--in short, whatever you're proud of! (No links to
businesses or giveaways. We have another party for these exclusively
this Tuesday called Market Your Biz & Giveaways at 5 pm, PST.)


2) Then follow as many blogs as your heart desires, preferably starting first with
the one before you and after you, before branching out. (Following the
host and co-host, too, will be very much appreciated, and we'll
definitely follow back.)


Displaying the party button, though optional, is very much appreciated.
This is a combination of linky party (where we can show off our
creations) and of blog hop (where we can follow as many excellent
bloggers as we like), hence the name Creative Bloggers' Party & Hop.

The link opens up every Sunday at 5:00 pm, PST.


Because we like something different, we're using the reverse
entry for inlinkz - so the most recent participant will show up as
number 1, hence giving everybody a chance to get the #1 spot.


All right. Bring 'em on!


Thursday, July 28, 2011

TV Time

Oooooookay.

We are officially getting to the time of the summer when the sickness hits me. I need fall TV.

STAT.

We're all caught up on our Modern Family reruns. I've taken to recording Sex and the City repeats on our DVR. It's a long time 'til the middle of September, you know.

Thank you, TV Gods, for these shows that have piqued my interest lately....

Design Star...I haven't watched all of the seasons, but I've gotten into this latest one. No one is standing out to me, but I have decided I cannot stand the host, Tanika Ray. Everything she says is so....nuanced.


via

Giuliana and Bill...Okay, this show could be mildly considered "mind candy." Well, maybe not mildly. I enjoy it, though. I got hooked on it last summer. I have admired how forthright they have been about their infertility. If we're keeping real here, we've struggled with what I would term "mild" infertility--and it's nothing compared to what some people experience in their quests to become parents. However, I know whether mild or not, it's so hard. I've appreciated their honesty very much.


And starting this week.....Project Runway. I've watched each season and I truly enjoy it. As a devotee of good design in general, I like seeing what the designers create. Also, they never cease to add several doses of drama! Dishing about this show with my girls--my mom, my sister and my sister-in-law--is fun, too.


I'm sure that photo will elicit a comment from my husband. And to think she's had two more kids than I've had.....; )

Wednesday, July 27, 2011

The Wall Project, Part 2

Okay, here we go.....Part 2. We did six rows of rocks on our big retaining wall. We had envisioned the top layer going all the way across the garden to dip into the soil line, but we had to regroup, due to the contour of the ground. We actually had to go inside and Google pictures of "sloped retaining walls" so we could decide how we wanted it. (you know, that whole test of marriage thing) So, we decided to stair-step them down gradually to meet the soil. I think it turned out well! .


After building the behemoth wall, we added our third wall. This one was only two levels high, so it was a piece of cake to build after the big one. It's not designed to hold back a ton of dirt....I like to think of it as "icing" on the whole design. It ties in the rock material over the entire garden and completes the idea.


Here is a pic of the first row, with the limestone base. There is sand underneath the rock that is laid there.


The finished third wall. One key component--notice how the first layer is almost completely buried.


We took on our wall project starting last week. That's right, we built these walls when the heat index was 100+ degrees. Our neighbors pretty much thought we were crazy. Here you see the "shade station" set up for the little ones and us.


Phase two of the wall project involved filling in the garden with topsoil. We also needed to fortify the wall properly so it could drain and the soil would not drain out with it. We used landscape fabric, which the water will pass through, against the rocks and backfilled it with a layer of limestone, then soil.


It took about forty bags of topsoil to fill this in, plus the area by the little wall. Some of the bags were torn, so we got those for $0.66. : ) I considered having a yard or two of soil delivered, but the delivery was going to cost more than the dirt! : ( In this shot, you can also see how we finished out the stair-step look on that wall.


Here is a shot of the last two finished walls. We are planning to plant a tree down on the lower level by the third, small wall.


Whew! Phase three of the project would be moving around some of the plants we had to move to build the walls. That will make for a riveting Part 3, which I'll post next week!

Monday, July 25, 2011

The Wall Project, Part 1

There are some house projects that we would label a "test of marriage."

Our first one, we built at our old house.


I have no idea how it held up so well over the years, since we used no base materials on it....that's right, just laid them right into the soil.

We also had two children.....which could--at moments--qualify as "tests of marriage."

And our latest (I would never say "last," lol)...our new house has many more slopes than our last, so on our list of projects was to build a few retaining walls to level out the garden areas. Here is the before.


The first mission was to eradicate the weeds. Some of them were starting to look quite pretty! And tall.


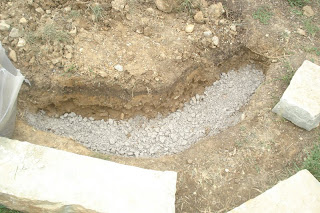
We ordered our pallet of buff stone. The day before it was delivered, we began digging the holes.


And our pallet arrived the next day. A huge thrill for my 5-year-old when the truck delivered it and used a little Bobcat to lift it onto the driveway.


Charlie took advantage of some deep trenches to build a bridge using rocks and bricks for his little cars.


The guys at both the stone supplier and the hardware store were extremely helpful. We also picked up a booklet that explained step-by-step what to do. Since, you know, our last one was built by the book. ; )

Basically, you dig your trench, fill in with a crushed limestone gravel, top with sand and then place your rocks. The most used tools in this project? A level and measuring tape. If your first row of rocks is not level, you have no chance of your wall standing up to anything. Or looking good. It ALL has to be level.


After the first level is laid, then you have to find the right length rocks to fit the second row...and make sure they are roughly the same height. It became more lengthy of a process, since we were working with imperfectly shaped rocks. They were all roughly 4" high and 8" wide, but there were variations and you have to choose rocks that will fit together and look good placed on top of one another.


Here is our first small wall, finished. It really levels out the area where the ground dips in front of the front walk.


Then, we began the second wall, having felt victorious with our first one. This wall needed to be five-ish rock rows high, so the stakes were raised here. We started with our first row. We used that d$%^ level quite a lot....


This pic shows the third level being laid.


This post is getting picture heavy, so I'll continue with the next one. As I said, it was a gargantuan project. Pictures are forthcoming, but tomorrow I'm planning to buy topsoil to fill in the planting beds!

I see a light at the end of the tunnel......; )

P.S. Major props go to my husband, Freddie, who did the majority of the rock lifting and digging. We nursed our battered bodies with ibuprofen and adult beverages at the end of the day. : )

Sunday, July 24, 2011

Deco book

Well, friends, I have to be honest when I admit that I have a bit of a Type A personality. I also label some of my posts as "organization," so I think I must have a problem. I actually had a moment recently when my husband was looking for something of which I should know the location...and I could not find it! Egads.

Note...I will never, never profess to be able to find something that belongs to my husband. His domain is his black hole.

Anyway. So, I realized the other day that I started a system to organize the paints and fabrics I have used in my house. I know true designers most likely have more sophisticated systems than mine, but mine suits me and it was pretty easy to put together.

I had a little photo book. I'm not crazy about the pattern on the cover, but it works and I already had it.


I put my paint chips or labels in the clear pages. I also add fabric swatches that I have used or may use. This way, when I shop, I take along my little book and everything is right there.

Here are the chips for my son's room...


These pages are for the living room/kitchen. I have the green color, plus the white I used to paint the mirror. The fabric is what is on my valances.


Paint for the hall bath upstairs. I don't have the paint chip (lost it....), so I painted a sample and also included the label, so I have the numbers if I ever need more mixed.


Front dining room...two greys and a fabric I have used. Other fabric swatches are hanging on the wall.


Office colors and fabrics. I used the third shade down.


The $%^&* front door color. Bottom shade. The bane of my existence as of late (see post here).


I also added some paint chips that have caught my eye for use in other rooms.


The next two pics are pages of paints I used at our old house....I keep them so I can remember the names and just in case I'd like to use them again!


One thing I realized--it would also be helpful to have some notes with measurements if you need that also when you are shopping for window treatments or furniture. I haven't added these, but I should!

Do you have any ways that you organize your home dec stuff?

P.S. The Wall Project is making serious headway and now we need to order dirt. I'll post pictures next week. It has been a consuming project!!

Stuff and Nonsense


Friday, July 22, 2011

Silhouette tutorial

I recently added silhouettes to our living room wall....and today I'm going to show how I did it. Here is what my living room wall looked like before...


There are a multitude of reasons why I like the white couch and mirror in their spots (you can read more about that here). I decided to add my silhouettes to fill in the space around the mirror.

This project was not hard at all...but it definitely did require some prep work. Before I actually assembled them, I had to do these things:
  1. Buy frames at IKEA. I actually had to make a second trip, since they were out of the ones I wanted the first time. Arghgh.
  2. Buy black paper and background paper at the craft store.
  3. Take profile pictures of all family members.
  4. And....get profile pics developed.
I was a little worn out on the project before I even started to assemble them. Luckily, the assembly went really fast. Otherwise, I may have thrown in the towel. ; )

The true-to-form way of making a silhouette would be to position the subject sideways against a bright light shining on a piece of paper on a wall. Does that make sense? Then you would trace the shadow...which would make your silhouette. (Note--I have no idea how they made the really tiny ones in the last few centuries) I decided to use 8x11" profile photos and cut them out.

First, I bought my four frames at IKEA. They were the Ribba frames, $10.99 each. I liked the clean look of the white frames with my mirror.


I had taken profile pics of the three family peeps and had my husband take my profile photo. I got these developed at Costco for about $1.30 apiece.

One of the trickiest parts was deciding what size to use for developing my photos so they would fit in the frame. My frame was 11x13" and the mat was roughly 8x11", so I decided to develop the photos at that size. I wanted to use the mat to beef up the look of the frames. Had I not done that, I would have developed the photos at the 11x13" size. So...it would be possible to make 5x7" silhouettes, you need to just match the size of your frame/mat and the size of your photos.


I purchased scrapbook paper at the craft store for about $6. I chose black and a textured off-white.


This is where you could have a little fun...I considered choosing a patterned background and doing my silhouettes in a white or cream, but I decided to go for a traditional look. There are million different ways you could go with this and the possibilities are endless.....one benefit I realized is that I could easily change out the background paper and also the color of the silhouette. You would simply recut the silhouettes out of the new paper. I kept my cut photos in case I ever want to change the silhouettes.

I really love scrapbook paper...I truly am not a scrapbooker (never got that craft gene, I guess) but the patterns and colors are great for all kinds of projects. Plus, the paper is really cheap! I've used it a lot as a mat for old photos/pictures.

Here is the textured paper I chose. I thought it would add a little texture to the whole look.


I positioned the photo in the corner of the black paper and affixed binder clips so the photo would not move while I cut. If it were to move, that would throw off your whole silhouette.


I cut around the edge of the profile. You have to be discerning when choosing to cut through a weird piece of hair sticking up or something. Once I was done, I fixed any small spots by trimming carefully. Here you can see the photo cut out next to the black silhouette piece.


Next, I disassembled the frames and cleaned the glass (one of my favorite parts of doing a frame project).


I added the mat and centered the silhouette in the center. You can see I added a piece of Scotch tape in the middle. I didn't do that at first and my silhouette was sliding around in there. I also added small piece of tape on the ends of the mat so the backing paper would stay in place as well.


I assembled the frame and added the wire that was included.


And...there is a finished silhouette. I did notice once I was done that my silhouette is a little smaller than the rest....I think this is because Freddie took that picture and was not as close to me as I was to all of them when I took the photos.

I also like the way the three whites/creams play together.


Now, the mirror, complete with the silhouettes.


I hung the upper right hand silhouette first, then positioned the one underneath. I then measured the distance from the mirror to the silhouette and hung the upper left. Admittedly, I did have to raise both of the lower ones (and covered the wayward hole in the process) so they would be even with the bottom of the mirror.

As I mentioned in my previous post, I like how the silhouettes add a personal feeling. Plus, they fill out that wall nicely!


I declare victory, since even my 5-year-old can ID whose silhouette is whose. ; )


Stuff and Nonsense


The DIY Show Off