Monday, August 29, 2011

Baby love

It has been quite exciting in the last few months.....one of our good friends and one of our neighbors had babies over the summer.....and another of our good friends is due any minute now. It has been (and will be!) lovely to make the acquaintances of these brand-new babies.

Needless to say, I have been working on some baby gifts. I do crochet and I have made a few baby blankets recently. I would say that I am a "simple" crochet-er, although I can follow easy patterns. Really, I don't have to patience (or the time?) to figure out difficult crochet patterns. It's like reading another language! Here is one of the blankets I made this summer:


I use a half-double crochet stitch and then add an edging...nothing too complicated!

I was also struck with inspiration fom a blog I love called Crazy Wonderful. It's full of great decor, DIY and mom posts. Shelley had made this super cute applique shirt for her daughter....


I thought it would be really cute to applique onto burp cloths and bibs. So, I picked up a square of fabric at the fabric store, along with some heat activated fusible paper (can't remember if that's the correct term?). I also had bought some plain burp cloths and bibs.

I cut out my shape, both the transfer paper and the fabric.


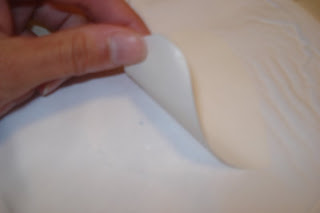
Once you iron on the fusible transfer paper, you peel off the paper and the sticky side is left behind.


Carefully line up your fabric cutout and lay it on the sticky side. Then, take your iron and use the medium setting with no steam to attach the fabric cutout. It will take a little bit of time to get it to fuse.


Since we know what baby's name will be, I chose to do an "S" on a bib and a burp cloth.


Although the fusible transfer paper will hold it together, it's best to run stitches around the edges to keep it secure. Especially for something baby-related....those bibs and burp cloths will take a beating.

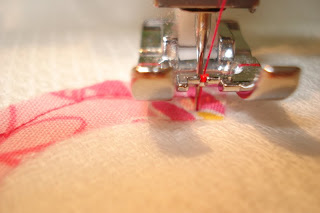
I chose a hot pink thread. I ran it around the edges of the fabric, keeping about 3/8" from the edge. If it's not totally perfect and even, it adds to the charm a bit.


If you're doing a shape with lots of curves like my "S," you'll want to make sure that you rotate the shape as you're sewing. It's best to stop with the needle in the down position, turn the whole fabric and continue. In the picture below, you can see a button in the upper-right corner....that is the button on my machine that keeps the needle down when you stop. (it's the first time I ever used that button!) To do the "S," I probably had to stop and rotate about 20 times.


Here is one of the burp cloths. I attached a strip of the fabric to the end.


Here are the two bibs and the two burp cloths I made.


I hope the new mom and dad like them! We can't wait to meet baby Sydney!

Linking to.....
Tip-Toe Thru Tuesday at Crayon Freckles
Feathered Nest Friday at French Country Cottage
Simply Creations at Simple Home Life
Sunday Showcase at Under the Table and Dreaming
Project Parade at The DIY Showoff
Creative Bloggers' Party and Hop at Homemaker on a Dime


Saturday, August 27, 2011

Tutorial: Pouches for drying herbs

As I mentioned last week, I've started drying herbs from my herb garden a little earlier this year. I decided to do so once they were getting a bit leggy....cutting them back allows me to dry some of them. Plus, giving them a trim encourages new growth! Some of the herbs with longer stems are easy to tie in bundles and hang upside down. I've always had a hard time, though, with some of the herbs that do not have long stems and are hard to hang. I used to dry them on cookie sheets on top of the fridge, but I don't like having them up there, taking up space.

Sometimes, I forget about them, too. Ooops.

I decided this summer to try making some bags in which I could put the smaller-leafed herbs to hang and dry.

You will need:
--some fabric that will let air through...mesh or tulle
--thread
--sewing machine

I chose a fabric remnant of white tulle at the fabric store. It cost about $2. I have been looking around for a more substantial mesh with no luck....but the tulle works great!


I laid the tulle out so it was folded over on one side. I then cut it in half so I would have two bags.


I ran a seam down one side of the rectangle (perpendicular to the folded side). To keep the stitches from unraveling, I went forward-backward-forward, as you can see in the pic. I did this at the bottom and the top of the seam.


Here is one of my finished seams...


Once you have done it on both sides, you are done! If you wanted (or were a more talented seamstress), you could add a drawstring. That is beyond my knowledge right now....and this pouch is not really made to look pretty. It's purely functional. I mean, it's going to hang in my garage, people!!

Here are my two finished bags. One has thyme inside and the other has rosemary (which could be hung if mine had longer stems).


I used a little bag clippy to close the bag and clip to some yarn to hang in the garage.


Here are all of my bundles and my two bags.


They've been up there for a few weeks and I'm going to take them down today and mix up some Italian seasoning!


Friday, August 26, 2011

Summer Tour: West Michigan

Back to school this week. I must say, my feet sure have enjoyed those flip-flops this summer. They are saying "h%&* to the no" to my fancy school shoes!


Since my husband and I have been teaching for the last 12 years, we've had a lot of time in the summer to travel. Once upon a time, we traveled five countries in Europe in three weeks. Now with two kids, our trips are shorter and definitely more kid-friendly.

One stop on our tour this summer was West Michigan. One of my husband's grad school buddies has a family house on Lake Michigan in a small town called Pentwater. With a private beach! It is one of our favorite places to visit and since his friend was married, we have really enjoyed spending time with him and his wife. They recently had a baby this summer--she was just six weeks old and too cute.

                                                              Our Sweetie, playing on the beach

We also were in attendance at the Western Michigan Fair. Much fun was had by all. The people watching was unbelievable. And we saw the Demolition Derby!


I snapped some photos around the town, especially of some beautiful houses and gardens. Here is a pic of the harbor in Pentwater.


Here is a shot of a plant grouping at a really pretty garden I saw. I love this combo of balloon flower, coleus and zinnias....probably was also pretty when the iris was in bloom.


I was really digging this plant pot combination....King Tut grass with a maroon/lime coleus and petunias--the pink ones with the maroon centers and lime edges.


Generally, I'm not too crazy about water features, but I really liked the simplicity of this fountain!


I was in love with this fence and the loooooong hedge of hydrangeas. GORGEOUS.


This could be my dream house. LOVE. Situated on the channel out to Lake Michigan in Pentwater.


This house was so pretty, too.


Well-kept, pretty house and meticulous gardens!


If anyone needs me, I'll be soaking my feet and reminiscing about being Up North on Lake Michigan....

Linking to.....
Flaunt Your Flowers at Tootsie Time

Wednesday, August 24, 2011

Milestone: Goodbye, Tooth

When I became a mother nearly six years ago, my mother shared a bit of wisdom with me. She said, "Having a baby is the beginning of a long series of goodbyes."

Huh, you might say? Well, you say goodbye to the vibrating bouncy seat (I loved that thing). Then, the pacifier. Then, the exersaucer (loved that, too). Then, the bottle.....the high chair.....the crib.....diapers (bingo!!!).....tricycle. You see what I mean? (well, maybe not all of that in that order)

Well, this week, we said goodbye again....

I apologize for the blurry pic....we were busy prepping for the Tooth Fairy

Yup, that's right, my baby lost his first loose tooth.

And not only did we say goodbye to that, he's going to kindergarten on Friday...one of the biggest goodbyes.

A long series of goodbyes, it is.

I have to stop typing now.

Monday, August 22, 2011

Snapshot

One night last week, I had run downstairs to grab something for one of my kiddies at bedtime and I noticed a really pretty cloudscape right before sunset.

Blankies and pillows had to wait while I grabbed my camera to take a picture.


The way the dark clouds were underlit with pinks and oranges was amazing.

Saturday, August 20, 2011

Are you going to Scarborough Fair?

I've started drying herbs this year a lot earlier than I have before. Usually, I wait until the first frost is predicted....and then I head out to the garden to harvest. I like to dry my own and mix my own Italian seasoning. I think dried herbs at the grocery are rather expensive! Occasionally, I will give them as gifts, too.

The herbs had all been looking a little leggy, so I decided to cut them back and dry what I cut. I'm hoping the haircut will spur some more growth, too.

As for drying methods, I usually hang them upside down in the garage. I'm thinking about making a screen that I could hang high up in the garage to lay the herbs out for drying. I've not tried freezing them.

Here are the herbs I cut....clockwise from upper left: sage, rosemary, oregano and thyme.


Rosemary...


Thyme...


Here you can see the sage and the oregano tied in bundles to hang. I made a few herb bags to hang also, using some fabric remnants and my sewing machine. The thyme and rosemary will go in those. The thyme, especially, is too small and bulky to bundle. I'll follow with a post about the bags.


Hanging in the garage...


Do you grow herbs? If so, how do you use them and do you dry them? If you don't, why not give it a try? Herbs are very user-friendly. : )

Linking to these parties...
Time Travel Thursday at the Brambleberry Cottage
Simply Creations at Simple Home Life

Wednesday, August 17, 2011

Summer Tour: My Old School

Well, we are quickly approaching that time that is referred to by the three dirty words...Back. To. School. I'm kind of ready to go back, if I'm keeping it real here! I'm also super excited for my big guy, who is starting kindergarten this year. : )

As we approach the end of summer, it's time to reflect on some of the fun we had this summer....

If you couldn't tell from the post title,

a) we like to travel in the summer and...
b) we are huge Steely Dan fans at our house.

According to my sister, there are only two people in the world who like Steely Dan! It's how she knew my husband and I would hit it off. She introduced us....and we ended up married.

By the way, she has only ever fixed up two couples...and they both got married. I think she might have a career on the back burner if she needs it. : )

Anyway, we have taken a few small trips here and there this summer. One of our recent trips took us up to the Ann Arbor area to visit my husband's best friend and his family. We stopped by my old stomping grounds, Bowling Green State University, which is located in northwest Ohio.
I had not been there in a few years, so we took an afternoon to walk around and--of course--eat at Myles' Pizza Pub, one of the best pizzas in my life.


Well. Need more be said?

Anyway, I decided to snap some pictures of notable things and some flowers I noticed. Here is a shot of the main campus green.


I love black-eyed susan vine, although I have never tried it in my garden.


Here is the chapel on campus. As a music student, we sometimes had recitals and musicales there.


This is a shot of the raised seal in the middle of the green. Of course, there are all sorts of superstitions about it! Don't walk on the correct side, fail your semester....kiss on top, you'll be married. : )


Me and my kids in front of the seal...this is my first visit with them.


A pretty shot of another grassy area on campus.


I am so-so on geraniums, but these are beautiful!


This is the student union...it was rebuilt after I graduated and it's so nice now.


This fountain is in front of the administration building. Although the water forms are pretty, I think the starkness of the fountain leaves something to be desired....


And....the 60s-era clock tower. I would say the decade of the 60s dominates much of the BG architecture. And that's putting it nicely. : )


I'm even wearing my brand new BG sweatshirt that I bought there as I compose this post.

You can't deny the ORANGE and BROWN. : )

Monday, August 15, 2011

Easy marinade

I thought I'd share a marinade that we've been using a lot this summer! I can't remember where I found it--probably somewhere on the internet. It's really easy and very tasty!

You will need:
1/4c soy sauce
3T balsamic vinegar
1/4c olive oil
1/3c honey (or can sub sugar)
1 clove garlic, minced (or sub 1/8 tsp garlic powder)
1/2 tsp red pepper flakes

Mix and use for pork, chicken or beef.

We started with boneless chicken thighs. I love the Manager's Special section of the meat department.


You can see here that I subbed in garlic powder. I don't typically have fresh garlic cloves on hand! I've also been known to substitute sugar for honey if I'm out of a bottle of honey (substitution noted above).


Ingredients before mixing...


And mixed...


Here come the chicken thighs.


Refrigerate for a while...either all day or overnight. As an infamous person once said, "Who marinates the day of?" Um....me. I have two kids and can't think further ahead than five minutes sometimes. : ) I stick it in the fridge and give it a shake every now and then.


And voila! We baked ours in the oven, about 15-20 minutes at 350. I really wanted grilled chicken, but there was a downpour when we were making it. : ( At least it's good baked, too, for when it's cold out!


Enjoy!

Linking to these parties...
{wow me} wednesday at Ginger Snap Crafts
Show and Share at Southern Lovely
Time Travel Thursday at The Brambleberry Cottage
Fridays Unfolded at Stuff and Nonsense
Feathered Nest Friday at French Country Cottage
Simply Creations Link Party at Simple Home Life
Addicts (Not So) Anonymous at Addicted2Decorating
Creative Bloggers' Party and Hop at Homemaker on a Dime